Delete Autorun.inf Virus Without Any Software

Delete Autorun.inf Virus Without Any Software

Posted by Anonymous  |  at  11:18

There are Numerous softwares available that exclusively deal with Autorun.inf and other Autorun viruses, for example ‘USB Disk Security‘. But Inspite of installing such kind of software, Sometimes you might accidentally open your USB disk Drive (Pen-drive) without looking at the warning by your Antivirus Software and thus Affecting your System with Autorun.inf virus. Once Autorun.inf gets control on your System, it will repeatedly Block any USB Scanning Software preventing it from deleting. It also Restricts you from opening hard drives on a double click.
In such cases, the Traditional Method of deleting Suspicious Programs Using Command Prompt is quite Useful. So Lets start with the Steps:
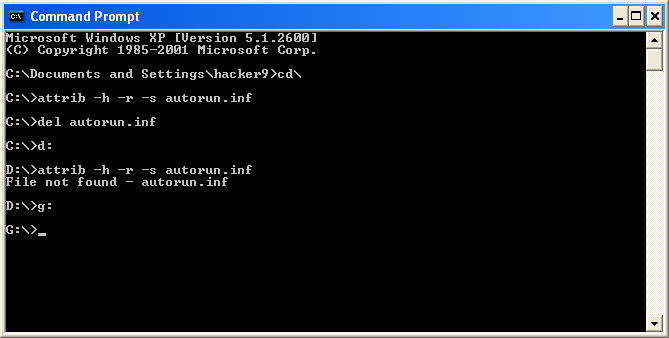
  • Open command prompt. Go to start > Run, and type “cmd” . Press enter.Type “cd\” and press enter to get to the root directory of your System.
  • Type “attrib -h -r -s autorun.inf” and press enter. This will look for autorun.inf in the selected Drive.
  • Type “del autorun.inf” and press enter. This will delete autorun.inf virus from the selected Drive.
How to Delete Autorun.inf Virus from pendrive without any Software
  • Repeat the above Steps for other drives. To navigate to other Drives, First type “cls” to clear your ‘command prompt’ then type “d:” . Repeat the Steps for all the Drives including your USB Disk Drive.
  • Restart your System.

Shut Down And Restart Windows PC In Seconds!

Shut Down And Restart Windows PC In Seconds!

Posted by Anonymous  |  at  22:38

Shutdown and restart icon


What do you do to shutdown or restart your windows XP? Of course you will do the following,
  • Click Start Menu  ->
  • Then click Turn Off Computer
  • Then you get a window with three icons saying,Stand byTurn Off and Restart  ->
  • Then you click on Turn Off button to shutdown windows and Restart button to restart your system
All this process will take 6-7 seconds and if your computer has some programs running in the background, you will get a End Now window, which will further take 4-5 Seconds. What if you do the same thing in a fraction of a second with a Click of a mouse?
You can surely do that by creating a Shutdown and Restart Icon on your Desktop. To do that follow the steps below,

Create A Shutdown Icon
To create a shutdown icon on your desktop do the following,

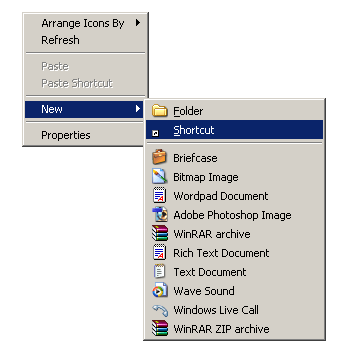
  • Right click anywhere on your desktop and select New Shortcut
Create-New-Shortcut
  • In the new window that opens Copy paste this command,
C:\Windows\System32\shutdown.exe -s -f -t 00
PasteShutdown-Command
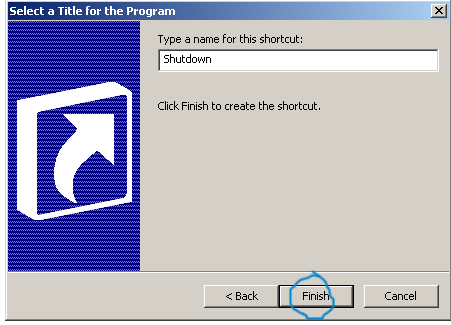
  • Click Next and Name it Shutdown as shown below
Name it Shutdown
  • You will get an icon as shown below,
Shutdown-icon
Clicking this Icon will Shutdown your Windows Instantly. If you don’t like the Icon Image, you can customize it too. Do the following

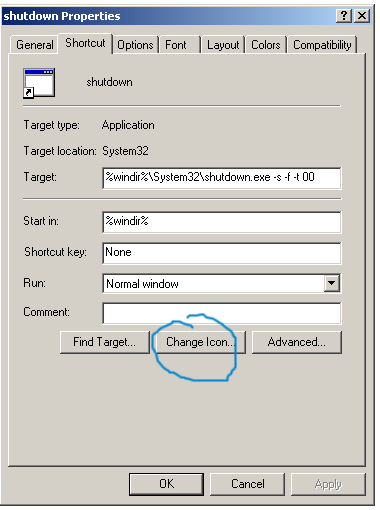
  • Right Click on the shutdown Icon and select Properties a window will open as shown below,
Customize-Shutdown-Icon
  • Click Change Icon button and choose an Icon from those available,
choose-shutdown-icon
You can also download an icon of your choice and save it to your local drive. To use an icon of your choice simply click the browse button and specify the path where you have saved the icon.

  • Your new Shutdown Icon will look like this,
REd-Shutdown-IconCreate A Restart Ico
Follow exactly all the steps discussed above to create a Restart Icon. You only need to add a different command for your Restart Icon. Here is the code for your Restart Icon,

C:\Windows\System32\shutdown.exe -r -f -t 00
After selecting an icon image you will get this,
TNT-Restart-Icon

Change The Background Image Of Windows 7 Logon Screen

Change The Background Image Of Windows 7 Logon Screen

Posted by Anonymous  |  at  22:36

Win 7 Customized Logon Screen 
How would you like to change the logon screen background in Windows 7 so as to give your Windows a customized look and feel? With a small tweak it is possible to customize the Windows 7 logon screen and set your own picture/wallpaper as the background. Changing logon screen background in Windows 7 is as simple as changing your desktop wallpaper. Well here is a step by step instruction to customize the logon screen background.
  • The image you need to set as the background should be a .jpg file and it’s size should not exceed 245KB.
  • The image resolution can be anything of your choice. However I prefer 1440 x 900 or1024 x 768. You can use any of the photo editing software such as Photoshop to compress and set the resolution for your image. Once you’re done, save this image as backgroundDefault.jpg.
  • You will need to copy this image to
C:\Windows\system32\oobe\info\backgrounds
  • You will need to create that path if it does not already exist on your computer.
  • Now open the Registry Editor (Start -> Run -> Type regedit) and navigate to the following key
HKLM\Software\Microsoft\Windows\CurrentVersion\Authentication\LogonUI\Background
  • If Background does not exist rightclick LogonUI, select New and then Key, and then name it Background. Now locate OEMBackground (listed on the right side). If it does not exist, right-click Background and select New and then DWORD and name it OEMBackground.
  • Double-click on OEMBackground and set the Value Data to 1.
  • Now log-off to see the new logon screen background. If you would like to revert back to the default background, just set the Value Data back to 0.
I hope you like this trick. Just try out and give your feedback!

Make Your Windows Faster

Make Your Windows Faster

Posted by Anonymous  |  at  22:29

Maintenance and cleaning up of your PC should be part of a regular routine to ensure that you don’t have any long-term problems with the computer. Unfortunately most basic computer users may not understand the mechanics of a computer or may feel intimidated with the maintenance. Just follow the step by step to make your windows Faster as never before

Disable CD Autorun
( Win XP PRO Only)
1) Click Start, Run and enter GPEDIT.MSC
2) Go to Computer Configuration, Administrative Templates, System.
3) Locate the entry for Turn autoplay off and modify it as you des
Speed Up Browsing

When you connect to a web site your computer sends information
back and forth. Some of this information deals with resolving the
site name to an IP address, the stuff that TCP/IP really deals with,
not words. This is DNS information and is used so that you will not
need to ask for the site location each and every time you visit the site.
Although Windows XP and Windows XP have a pretty efficient DNS
cache, you can increase its overall performance by increasing its size.
You can do this with the registry entries below:Windows Registry
Editor Version 5.00 [HKEY_LOCAL_MACHINESYSTEM
CurrentControlSetServicesDnscacheParameters]
“CacheHashTableBucketSize”=dword:00000001
“CacheHashTableSize”=dword:00000180
“MaxCacheEntryTtlLimit”=dword:0000fa00
“MaxSOACacheEntryTtlLimit”=dword:0000012d
Make a new text file and rename it to dnscache.reg. Then copy and
paste the above into it and save it. Merge it into the registry.
Disable Indexing Services 

Indexing Services is a small little program that uses large amounts of
RAM and can often make a computer endlessly loud and noisy. This
system process indexes and updates lists of all the files that are on
yourcomputer. It does this so that when you do a search for something
on your computer, it will search faster by scanning the index lists. If
you don’t search your computer often, or even if you do search often,
this system service is completely unnecessary. To disable do the
following:
1. Go to Start
2. Click Settings
3. Click Control Panel
4. Double-click Add/Remove Programs
5. Click the Add/Remove Window Components
6. Uncheck the Indexing services
7. Click Next
Optimise Display Settings
Windows XP can look sexy but displaying all the visual items can waste
system resources.
To optimize:
1.Go to Start
2. Click Settings
3. Click Control Panel
4. Click System
5. Click Advanced tab
6. In the Performance tab click Settings
7. Leave only the following ticked:
- Show shadows under menus
- Show shadows under mouse pointer
- Show translucent selection rectangle
- Use drop shadows for icons labels on the desktop
- Use visual styles on windows and buttons
Speed Up Folder Browsing

You may have noticed that every time you open my computer to
browse folders that there is a slight delay. This is because
Windows XP automatically searches for network files and printers
every time you open Windows Explorer.
To fix this and to increase browsing significantly:
1. Open My Computer
2. Click on Tools menu
3. Click on Folder Options
4. Click on the View tab.
5. Uncheck the Automatically search for network folders and
printers check box
6. Click Apply
7. Click Ok
8. Reboot your computer
Remove The Desktop Picture

Your desktop background consumes a fair amount of memory
and can slow the loading time of your system.
Removing
it will improve performance.
1. Right click on Desktop and select Properties
2. Select the Desktop tab
3. In theBackground windowselect None
4. Click Ok
Disable Unnecessary ServicesBecause Windows XP has to be all things to all people it has many
services running that take up system resources that you will never
need.
Below is a list of services that can be disabled on most
machines:
Alerter
Clipbook
Computer Browser
Distributed Link Tracking Client
Fast User Switching
Help and Support – (If you use Windows Help and Support leave
this enabled)
Human Interface Access Devices
Indexing Service
IPSEC Services
Messenger
Netmeeting Remote Desktop Sharing (disabled for extra security)
Portable Media Serial Number
Remote Desktop Help Session Manager (disabled for extra security)
Remote Procedure Call Locator
Remote Registry (disabled for extra security)
Remote Registry Service
Secondary Logon
Routing & Remote Access (disabled for extra security)
Server
SSDP Discovery Service – (Unplug n’ Pray will disable this)
Telnet
TCP/IP NetBIOS Helper
Upload Manager
Universal Plug and Play Device Host
Windows Time
Wireless Zero Configuration (Do not disable if you use a wireless
network)
Workstation
To disable these services:
Go to Start and then Run and type “services.msc”
Double click on the service you want to
change Change the startup type to ‘Disable”
Remove Annoying Delete Confirmation Messages
Although not strictly a performance tweak I love this fix as it
makes my machine ‘feel’ faster. I hate the annoying
‘are you sure?’ messages that XP displays, especially
if I have to use a laptop touchpad to close them.
To remove these messages:
1. Right-click on the ‘Recycle Bin’ on the desktop and then
click ‘Properties’
2. Clear the ‘Display Delete Confirmation Dialog’ check
box and click ‘Ok’!!

Protect Your Computer From USB Viruses-Top 5 Security Tips

Protect Your Computer From USB Viruses-Top 5 Security Tips

Posted by Anonymous  |  at  22:13

With increasing anti-virus security in place against email-aware viruses and malware, hackers are turning their attention to less well-defended routes such as USB drives. This is the latest method that’s used by hackers to torment innocent users. However, there are ways you can protect your computer from USB and Pen drive viruses.

1.Block USB Viruses

Invest in an excellent anti-virus program that has built in USB virus scan and remover. These anti-USB virus scan programs not only protect your computer from USB Autorun viruses but can also clean worms, Trojans and viruses in your USB memory sticks.You can try anti-virus programs for USB virus such as USB Virus Scan, USB Drive Antivirus and so on.
2.Disable Your Computer’s Autorun Feature
When you plug in a USB drive stick into your system, the Autorun feature initiates automatically. If your USB contains any virus programs, it’ll use the Autorun feature to infect your computer. To protect your computer, disable the Autorun feature.You can disable the Autorun feature via the Control Panel.
Alternatively, you can use antivirus software to disable and enable the Autorun feature whenever you want. Additionally, these USB blocking softwares allow system administrators to specify which removable storage drives users can access.

3.Update Your Device Driver

Keeping your USB device driver updated is a good way to ensure greater stability for your USB drives. While this won’t help eradicate USB viruses, USB device drivers are constantly updated to block viruses and deliver timely warnings. You can update your USB device drive from your Windows Computer Management feature in the Control Panel.

4.Use USB Firewall Software

USB firewalls prevent Windows OS from processing malicious programs when a virus infected portable USB device is opened. USB firewalls monitor only your USB devices, and not your CD and DVD drives. By using USB firewalls, you’ll be enabling a basic level of protection from the autorun.inf viruses that spread from portable USB devices.

5.Always Safely Remove USB Devices

Viruses are sometimes created via damaged documents. If you are transferring a set of files to your USB drive, make sure the transfer is complete before you eject the device. Always use the Safely Remove Hardware feature of Windows OS. This is because partially transferred or damaged files can in turn corrupt other files on your USB drive.

Skype: Tips, Addons, Hacks and Extras

Skype: Tips, Addons, Hacks and Extras

Posted by Anonymous  |  at  22:10

Skype
For millions of users, Skype is the VoIP solution of choice. If you’re just getting into this great telephone alternative, you are going to be surprised how much you can do with it. In this article we cover lot of tips, addons, hacks, and extras to help you utilize Skype to its fullest potential.
Starting Simple: Built-In Skype Features you Didn’t Know About
Skype is such a rapidly emerging technology that a lot of brand new users aren’t even aware of all the built-in features that Skype offers standard, not to mention the add-ons and hacks that you can improve it with. In this section we cover some often overlooked standard features of Skype that can dramatically improve your experience.
1 Call Forwarding
    Whether you’ve set your Skype account up on your home or work computer, the fact is, you are occasionally going to get important calls when you aren’t there. Thankfully, you can simply forward those calls to another Skype account or even a cell phone or land line. That way, even if your computer at work is shut down, as soon as a call comes in to your Skype account, the call will immediately ring on your cell phone, your home computer and your home phone line, meaning that no matter where you are you’ll be sure to get it. To forward a call click on the “Tools” menu and select “Options.” From there set the forwarding number in the “Call Forwarding & Voicemail” section.
2 Filtering and Blocking Users
    Skype is a great tool for both business and pleasure, but if you don’t take preventative steps, it can also cause you some serious security problems. VoIP Phishing also known as Vishing  is a new VoIP targeted scam in which cyber-criminals use a VoIP client such as Skype to call people and attempt to trick them into revealing important financial details such as credit card numbers or online passwords. But you can limit these attacks by simply blocking unwanted callers. To block unknown or unwanted callers, simply click on “Tools” and select “Options.” From there, select “Privacy” and choose the level of security that works best for you. When it comes to individual attacks, you can avoid repeat vishing calls by blocking the spammer by click
    ing on “Manage Blocked Users” in the “Options” dialog.
3 A DIY Home Security System
    Whether you want to keep an eye on your pet goldfish from work or just make sure no one has broken in the house while you are on vacation, Skype can double as an away from home monitoring system. Checking in is simple with Skype’s one and two way video calling. You’ll need two separate Skype accounts, a computer at home with a webcam, and access to the Internet. Using one account, setup the home version of Skype to auto-answer calls and automatically fire up the webcam. Then to check in, just use the second Skype account to call the first, and the webcam video will pop up.
4 Providing Customer Support
    Got a small business online? Want to offer some customer support without spending a fortune on telephony costs? Skype’s graphical click-to-call SkypeMe buttons are ideal for this. Create your SkypeMe button (free account needed) and embed the code in your website, weblog, template, email, or wherever you want it to appear. When someone views your web page (or email message), the button will indicate whether you are online and accepting Skye calls, busy, or offline. If you’re on the go and want to receive calls, just leave your Skype client running and set call forwarding (see above).

Plugins, Addons, and Extras

Think of the off-the-shelf version of Skype as a new car without any optional package. Sure, it will still get you to and from work, but it doesn’t have any of the bells and whistles that make your new toy exciting. Unlike car options, however, these Skype Plugins and Add-ons won’t cost you a fortune, and they’re easy to install to boot.
5 Using Skype to Sell your Services
    You’ve got information that other people can use, and with the Bitwine Skype add-on you’ll be able to leverage that information into an income stream. Whether you’re a lawyer, a mechanic, or a talented collector, there are people willing to pay for the information you have, and using Bitwine makes selling that information easy. Through Bitwine, you set up your hourly rate, then customers approach you about the topic they would like to discuss, you set up a meeting time, and at the end of the meeting Bitwine tallies up the time and will even coordinate payment via PayPal through another add-on, Bitwine extra.
6 Recording Calls
    There are a lot of add-on options for recording Skype calls, including the free Audacity audio editor. But Audacity has to be triggered manually, and since you don’t always know beforehand when a call should be recorded, the fact that Audacity is manual is a serious limitation. By contrast, there are a number of Skype recorders that start up automatically. HotRecorder is arguably among the best. HotRecorder allows searchable Meta text to be added to each recording, and works with Google Talk and other IM clients. For aspiring Howard Sterns, there’
    s a selection of Emotisounds such as laughs, claps, etc., that can be inserted into the conversation for later podcasting.
7 Enhanced Voicemail
    If you use your Skype phone for more than just the occasional long-distance call, you should enhance your voicemail setup beyond the basic Skype standard. Pamela offers (automatic) call recording, an answering machine for voice and video, automated chat reply if you’re away, Skype VoiceMail management, and email forwarding of audio files. In addition, Pamela will let you setup a separate greeting or voicemail message for different users, so that your business and personal calls won’t hear the same message. And best of all, Pamela allows for remote control, meaning that if you forget to change one of the voicemail settings before you go on vacation, you can make the changes via any computer anywhere.
8 Keep Up With New Music
    If you constantly find yourself wondering why everyone else’s iPod seems to have better music than yours, maybe its time to start branching out and discovering new music. Last.fm, a Skype add-on provides you with an easy forum to share your own musical preferences and listen to what other people like. With this add-on, you can browse through other Skype and Last.fm user’s music collections and listen in. While you’re listening, information about the song and artist you’re listening to is displayed and you’re given the ability to find similar titles. Setup is really simple, you just need to download the Last.fm extra, sign up for a free account at Last.fm and there download the Last.fm software. For those of you that are Mac users, Last.fm will still work as a Skype add-on, the only difference is that you will need to download the iScrobbler extra to make Last.fm Mac compatible.
9 Universal Chat and Language Translation
    It’s a global world out there, so whether you’re conducting business or pleasure with Skype, you are likely communicating with people around the world and may occasionally encounter language barriers. Thankfully, by using the quick add-on Universal Chat Translator you can communicate with anyone no matter what language they speak. The software only produces text translations, so you may feel like you’re watching a foreign film with subtitles, but the fact that the Universal Translator can read text in 11 languages and understand spoken text in 50 means that you’ll at least be able to get your point across.
10 A Complete Small Business Collaboration Solution
    If you’re running a small business or working as part of a team on a single project, real-time collaboration is essential. There’s no better way to supplement your Skype conferencing than with a collaborative desktop provided by Skype add-on Unyte. Unyte lets you choose which applications or documents to share with the other people on your conference call. Then everyone can be looking at the same documents at the same time, and when changes are made they appear on everyone’s screen so that there is no confusion. Pricing depends on the number of people you want to bring in on the conference, but you can give two-person collaboration a try for  “_blank”>free.
11 Combining Real-Time Document and Voice Collaboration
    If the setup hassles of Unyte are too much for you, a simpler solution that redefines easy-setup isTalkandWrite. TalkandWrite will give you video and voice conferencing as well as handle real-time collaborative document editing. That means, that not only will the changes you make be reflected on the other person’s screen, but you’ll also be able to see and talk with the other person about those changes as you make them. This easy Skype add-on can be a real time-saver for anyone who spends time working with a small team preparing for a project.

Mobility

With the advent first of cordless phones and then cell phones, every communication device is going mobile. So it doesn’t make sense that your most advanced communication tool, Skype, should keep you tethered to your computer. Here are a few Skype add-ons and extras to give you the freedom to get out from behind your desk.
12 Bluetooth and Skype
    The first step to mobility is just cutting the cord that connects you to your computer when you’re using Skype. You can think of this step as the advent of the cordless phone for Skype, it will get you mobile, but only within certain limits. Most newer computers are already Bluetooth capable, so purchasing and synching up a Bluetooth wireless earpiece or headset is extremely simple. In fact, you can use a single Bluetooth earpiece to handle calls from both Skype and your cell phone, so you may not need to buy anything if you’re already using a Bluetooth earpiece with your mobile. The only downside to going Skype wireless via Bluetooth is that you are limited by Bluetooth as to how far from your computer you can be. But for those that are just looking for a way to cut the wire and have a little more mobility around the office, Bluetooth is the perfect solution.
13 Mobile Phone Skype Calling
    Imagine if you could use SkypeIn or SkypeOut from your cell phone: you could make and receive phone calls to people around the world with the convenience of your cell phone but the pricing of Skype. Thankfully, that day is already here, but a surprising number of Skype fans just don’t yet know about the capability. Ego has been offering their Skype based cell phone service for almost a year. It lets you see who is online, make and receive calls with your Skype contacts, and use Skype Instant Messaging. If the idea of carrying both a Skype phone and a regular cell phone doesn’t suit you, TalkPlus has hacked the Skype API to create a server that functions as a Skype client, demonstrating that integrating Skype calls and regular mobile calls will soon be a reality. In fact, in November 2006, TalkPlus demonstrated a successful mobile call to Skype test id echo123. Their hack was then made public, and could be installed on mobile phones to talk to the Skype server. Since then, the service has temporarily gone MIA, but expect that very soon full cell phone/ Skype integration will be a reality.
14 Skype on a Cell Phone…Indirectly
    While the ultimate goal is complete Skype/ mobile integration, for now you can get a lot of the functionality of a Skype mobile phone by routing your mobile through your home Skype setup. By using a Skype on your mobile phone indirectly. Essentially, you will be using your mobile phone to call your home computer, which will in turn ask you to enter a password, and then allow you to use your SkypeOut credits to call your Skype friends. While the system isn’t yet perfect, in part because you’ll be racking up both your cell phone and SkypeOut minutes at once, it is an effective way to be able to make Skype calls from your cell phone now.
15 Bringing Skype to your TV
    Imagine, you hear your Skype phone ring, but it’s the fourth quarter of the game, and who knows if the call is even important. You don’t want to get up, but it seems you have no choice. Thankfully, with mcePhone you won’t have to get up to find out who is calling ever again, as your incoming Skype calls will simply pop up on your TV screen. From your TV you’ll be able to see your own Skype-Status (online, offline, etc), the number of SkypeOut credits you have, which of your Skype friends are currently online, and whether you have any new voicemails. And when a new call comes in, a small window automatically pops up letting you know who the caller is, and it will even let you decide whether you want to accept, ignore, or reject the call all by remote control.
16 Having your Skype Announce Who is Calling
    Despite its simplicity, AudioID is easily one of the most useful Skype hacks for home users. AudioID will allow you to setup an individualized announcement for each caller that will play over your computer or home speaker system. So instead of hearing a generic computer ring from somewhere way back in the home office, you can hear a clear message from your computer, “Call from Kristy” which will let you decide whether you need to run back to take the call or whether it can wait until later.

Pure Silliness: Skype Hacks Designed to Entertain

Much of Skype’s appeal is the connectivity and productivity it brings to its users. But Skype can also just be a great way to have a whole lot of fun. These simple hacks will help you do just that.
17 Voice Analysis Love Detector
    Whether you’re using a Skype based dating service or are just want to know if that secret crush feels the same way about you, the Love Detector is a fun Skype add-on that uses SENSE voice analysis technology to detect love and other emotions over your Skype calls. But before you rush out and purchase the full version, you can give this add-on a free trial run and start testing how people really feel about you.
18 Making Board Games Fun Again
    Need a break from work but need to stay in front of the computer so your boss doesn’t get suspicious?
    There are a whole host of classic board games that you can add-on to Skype for some fun diversion. WithBackgammonBingoChess and Checkers, you can compete against your fellow Skype users using ‘old-school’ games with ‘new-school’ interfaces.
19 KishKish Lie Detector
    If you’re using your Skype phone to conduct business deals and you want to make sure the other party is being truthful, or you just want to prove once and for all that your boyfriend is a cheater, try KishKish the Skype Lie Detector add-on. KishKish detects the stress level of the person you are talking with over Skype, and it uses that information to detect when they are lying.
20 Creating a Lip-Snyc-ing Avatar to Hide Behind
    Video calls can be great for connecting with people on a more personal level. But sometimes, whether because we don’t know the caller well or it just hasn’t been a good morning, we don’t want to be seen. Instead of feeling embarrassed in front of the camera, CrazyTalk allows you to create your own Skype video avatar and have him/ her lip-sync anything you say. This fun add-on is surprisingly simple to setup and use, and will allow you create your own custom avatar from any digital photo. Once set up, it takes just a click to have the avatar pop up, cover the Skype video screen and begin lip-sync-ing.
21 Disguising your Voice
    There’s nothing more entertaining than changing your voice to mess with your friends. Whether you want to impersonate their boss or their girlfriend, DoNaut has got you covered. This easy to install Skype add-on will allow you to adjust the tone and quality of your voice throughout the call. In addition, you can use DoNaut to pipe in some background music to your Skype calls off your favorite music player such as iTunes, or Windows Media Player.
22 “Can I Have Your Number?” … “Umm, No.”
    Whether from a bad blind date, or a sales person that just won’t take no for an answer, we’ve all been in a situation where we didn’t want to give the person our phone number or Skype information, but it seemed unavoidable. Thankfully, the folks that compiled the original NotMyNumber Directory have given Skype users the ability to provide people with a fake number as well. This simple Skype add-on will give you access to local numbers in every major city that are guaranteed to be inactive. That way, when someone you don’t want to talk to asks you for your Skype number, you can very casually access the Skype NotMyNumber Tool and offer them a completely fake number.

Ad
vanced Hacks

If you’re tech savvy and really want to push your Skype setup to the limit, this list of advanced hacks can help you create functionalities that are sure to improve your experience and wow your friends. But be forewarned, even though a lot of these hacks will be simple to advanced tweakers, if you’re new to Skype you may find some of these hacks are over your head.
23 Multiple Logins
    If Skype has become your family’s communication device of choice, then no doubt you have experienced the problem of having multiple members of your family trying to use your home Skype account at the same time. For a quick fix to this problem, just setup setup multiple logins, so that everyone in the family can use their Skype ID whenever they want. So far this hack is only available for Windows XP users, but keep an eye out for a hack compatible with your OS in the near future.
24 Design your own Hack
    Don’t see a hack here that interests you? Or maybe you need custom functionality and can’t wait for someone to create it. Skype has open developer API, so you can write your own plugins which can be created in HTML or Java, or as an EXE or DLL. If you’re looking for a community to help you with some of the programming hurdles, the Skype Developer Zone blog will even keep your questions private so that no one steals your new idea before you get it finished. And when your application is complete, the site also offers a Publishing Studio Publication Studio to manage your published component.

This list of 25 Skype hacks, modifications and add-ons are all designed for one thing… improving your Skype Experience. And with your newfound Skype knowledge you are now just a hack away from experiencing this great service in ways you never have before. So go out, implement a hack or two, and enjoy your improved Skype service. Happy Skype-ing!

Different Types of Virus and Worms Explained

Different Types of Virus and Worms Explained

Posted by Anonymous  |  at  22:07


System Sector Viruses 
System sectors are special areas on your disk containing programs that are executed when you boot (start) your PC. System sectors (Master Boot Record and DOS Boot Record) are often targets for viruses. These boot viruses use all of the common viral techniques to infect and hide themselves. They rely on infected floppy disk left in the drive when the computer starts, they can also be “dropped” by some file infectors or Trojans.
Stealth Virus
These viruses evade anti-virus software by intercepting its requests to the operating system.
A virus can hide itself by intercepting the anti-virus software’s request to read the file and passing the request to the virus, instead of the OS. The virus can then return an uninfected version of the file to the anti-virus software, so that it appears as if the file is “clean”.
Bootable CD-ROM Virus
These are a new type of virus that destroys the hard disk data content when booted with the infected CD-ROM.
Example: Someone might give you a LINUX BOOTABLE CD-ROM.
When you boot the computer using the CD-ROM, all your data is gone. No Anti-virus can stop this because AV software or the OS is not even loaded when you boot from a CD-ROM.
Self-Modification Virus
Most modern antivirus programs try to find virus-patterns inside ordinary programs by scanning them for virus signatures.
A signature is a characteristic byte-pattern that is part of a certain virus or family of viruses.
Self-modification viruses employ techniques that make detection by means of signatures difficult or impossible. These viruses modify their code on each infection. (each infected file
contains a different variant of the virus)
Polymorphic Code Virus
A well-written polymorphic virus therefore has no parts that stay the same on each infection.To enable polymorphic code, the virus has to have a polymorphic engine (also called mutating engine or mutation engine). Polymorphic code is a code that mutates while keeping the original algorithm intact.
Metamorphic Virus
Metamorphic viruses rewrite themselves completely each time they are to infect new executables. Metamorphic code is a code that can reprogram itself by translating its own code into a temporary representation, and then back to normal code again.
For example, W32/Simile consisted of over 14000 lines of assembly code, 90% of it is part of the metamorphic engine.
File Extension Virus
File extension viruses change the extensions of files. .TXT is safe as it indicates a pure text file. With extensions turned off if someone sends you a file named BAD.TXT.VBS you will only see BAD.TXT.If you’ve forgotten that extensions are actually turned off, you might think this is a text file and open it. This is really an executable Visual Basic Scriptvirus file and could do
serious damage .
Countermeasure is to turn off “Hide file extensions” in Windows.

That’s it…

64 Tips to Make Windows 7 Faster, Secure, Easy to Use

64 Tips to Make Windows 7 Faster, Secure, Easy to Use

Posted by Anonymous  |  at  22:02

Hello Guys ,these are some tips for Windows 7 users .. 


Windows 7 may be Microsoft’s most anticipated product ever. It builds on Windows Vista’s positives, and eliminates many of that OS’s negatives. It adds new functionality, too—all in a package that is less resource-hungry than its predecessor.
And whether or not you’re upgrading from Vista or skipping it altogether and moving up from Windows XP, you’ll need to knowhow to make the most of it in your environment. Here are 77 tips and tricks to get you there.
1. Pick Your Edition. Most business users do not need the more expensive Ultimate Edition; stick with Professional unless you specifically need BitLocker.

2. Upgrading? Go 64-bit. As the second major Windows release to fully support 64-bit, the x64 architecture has definitely arrived on the desktop. Don’t buy new 32-bit hardware unless it’s anetbook.
3. Use Windows XP Mode. Yes, it’s only an embedded Virtual PC with a full copy of WinXP—but it’s an embedded Virtual PC with a full copy of Windows XP! This is the first profoundly intelligent use of desktop virtualization we’ve seen—and a great way to move to Windows 7 without giving up full Windows XP compatibility.
4. Use Windows PowerShell v2. More than just a shell, this is the administration tool you’ve always wanted: Parallel, distributed processing for administrative tasks! Manage 100 machines literally as easily as you manage one with the new Remoting feature. Windows PowerShell v2 ships for the first time in Windows 7, and within six months will be available for older versions of Windows.
5. Use AppLocker. We’ve been fans of Software Restriction Policies since Windows XP, and AppLocker finally makes application whitelisting possible. Use it to enhance or even replace your anti-virus software, ensuring that only the software you want to run will run.
6. Shift to and from Explorer and CommandPrompt. The classic Windows power toy Open Command Prompt Here is now an integral part of Windows 7 Explorer. Hold down the shift key then right-click a folder to add this option to the property menu. While you’re in a command prompt, if you want to open an Explorer window with the focus of the window on the current directory, enter start.
7. Record Problems. The Problem Steps Recorder (PSR) is a great new feature that helps in troubleshooting a system (see Figure 1). At times, Remote Assistance may not be possible. However, if a person types psr in their Instant Search, it will launch the recorder. Now they can perform the actions needed to recreate the problem and each click will record the screen and the step. They can even add comments. Once complete, the PSR compiles the whole thing into an MHTML file and zips it up so that it can be e-mailed for analysis to the network admin (or family problem solver, depending on how it’s being used).
Figure 1 The Problem Steps Recorder dramatically speeds up troubleshooting. (Click the image for a larger view)
8. Make Training Videos. Use a tool like Camtasia to record short, two to three minute video tutorials to help your users find relocated features, operate the new Taskbar and so forth. Get them excited about Windows 7—and prepared for it.
9. Start Thinking About Windows Server 2008 R2Some of Windows 7′s more compelling features, like BranchCache, work in conjunction with the new server OS. The R2 upgrade path is pretty straightforward, so there’s little reason not to take advantage of the synergies if you can afford upgrade licenses.
10. Prepare Those XP Machines. There’s no in-place upgrade from Windows XP to Windows 7, so start planning to migrate user data now, in advance of a Windows 7 upgrade deployment.
11. Consider Clean Installs. Even when upgrading Windows Vista machines, consider a clean install rather than an in-place upgrade. Yes, it’s more hassle, but it’ll produce a more trouble-free computer in the long run.
12. Consider Upgrade Assurance. Even if you’ve never bought it before, consider it for your new Windows 7 licenses. Access to the Microsoft Desktop Optimization Pack (MDOP), which includes App-V, MED-V and other cool technologies, is worth the premium.
13. Find New Tools. Within Control Panel is a single Troubleshooting link that leads you to all of your diagnostic tools on the system. There are additional tools, however, not installed by default. Selecting the “View all” link in the top left-hand corner will help you to see which troubleshooting packs are local and which ones are online. If you find a tool that you don’t have, you can grab it from here.
14. Understand Virtual Desktop Infrastructure (VDI). Windows 7 plays an important role in Microsoft’s VDI strategy, where virtualized Windows 7 machines are hosted on a central virtualization server using a special blanket “Enterprise Centralized Desktop” license. Read up and figure out if you can take advantage of this new strategy.
15. Prepare for DirectAccess. DirectAccess makes it easier for users to remotely access their office-based resources, without a VPN. DirectAccess also opens up remote computers more fully to Group Policy—but it requires Windows 7 and Windows 2008 R2.
16. Employ Deployment Image Servicing and Management (DISM). If you quickly want to list or manage Windows packages, features or drivers, use the command-line utility DISM. The “image” in the name may fool you into thinking that this is solely a deployment tool. An online command-line switch lets you manage the features in the currently loaded OS. To get a list of the loaded Windows features, enter dism /online /get-features /format:table. To enable a feature, enter dism /online /enable-feature /featurename:.
17. Embrace Troubleshooting Packs. Designed to help users troubleshoot and solve problems on their own, you need to update your support procedures to acknowledge these Packs. For example, don’t force users to repeat steps the Pack already walked them through, and consider developing your own Packs (in Windows PowerShell) to support in-house systems.
18. Check Reliability. The Reliability Monitor was introduced in Windows Vista as ‘The Reliability and Performance Monitor.” In Windows 7 it has been separated from Performance Monitor and moved to a new location under the Action Center. You open the Action Center in Control Panel and then look under the Maintenance options for the “View reliability history” link. You can also just type in Reliability Monitor from the Instant Search (see Figure 2).

Figure 2 The Reliability Monitor has been broken out separately from Performance Monitor. (Click the image for a larger view)
19. Accept Diversity. Not every organization will be ready to move entirely to Windows 7 right away. That’s fine—but that shouldn’t mean the entire organization stays on Windows XP, either. The myths of the cost savings of having on
ly one OS have been largely disproven or downplayed, so use Windows 7 where it makes sense to do so.
20. Get Snippy. The snipping tool has also been around in various incarnations but it’s even easier to use in Windows 7. Launch the tool, then drag and drop any part of your screen. The tool will snip the selection. You can save it as a graphic file or annotate with basic drawing tools. Teach your end users how to use this tool so they can grab the snapshots of their problems and send them to the help desk. Or create your own library of visual notes.
21. Presentation Nirvana. Press Windows+P to access the new Presentation mode, and easily turn on your projector and laptop screen at the same time. No more messing with vendor-specific utilities and arcane keystrokes. (Windows+X accesses the Mobility Center, with additional presentation options.)
22. Cut the Clutter. Press Windows+Home to minimize all but the current window, removing background clutter and letting you focus on that report your boss has been bugging you about.
23. Be a Mouse-Click Administrator. Windows 7 makes it easy to gain admin rights with a keyboard shortcut. Click on Ctrl+Shift on a taskbar-locked icon, and voila! You’ve launched it with appropriate admin rights.
24. Faster Installations. If your computer is capable of booting from USB, try this: XCopy the Windows 7 installation DVD to a sufficiently large USB drive, boot from that drive, and install Windows from there. It’s faster than a spinning platter.
25. Burn Discs with a Click. Or two; double-click an ISO file to burn it to your CD or DVD writer.
26. Restore Point Previews Many of us used to shut off System Restore because we were terrified to actually use it; under Windows 7, we can be much calmer. After selecting a Restore Point, Windows will now offer to show you which files and folders will be affected by restoring to that point.
27. Sync Time Zones. If you work with offices in different time zones and frequently find yourself missing meeting times because you are not in sync with their time zone, try the “Additional Clocks” feature that was first introduced in Vista. Within your Date and Time settings is a tab called Additional Clocks, where you can add two or more clocks to your taskbar time, and set them to provide different time zones from your current time zone.
28. Configure User Account Control (UAC). Even if you’re a UAC hater, give it another try. Go to the Control Panel to configure its behavior to something slightly less obnoxious than what Windows Vista had, and see if you can’t live with the extra protection it offers (see Figure 3).

Figure 3 User Account Control, the bane of administrators, has been revamped and improved. (Click the image for a larger view)
29. RoboCopyCopyCopy. The always-useful Robocopy.exe can now run multi-threaded; run Robocopy /? to review its new parameters (like /MT for multithreading) and make your copies go faster.
30. Remote Desktop Console. Windows 7 Remote Server Administration Tools (RSAT) does not include a console-based remote desktop utility. And even if it did, the standard remote desktop console has some nagging limitations: It can’t move connections around in the list; it can’t sort by folders and so forth. If you manage lots of servers from your Windows 7 workstation, try downloading a copy of mRemote from mremote.org. This donation-requested utility allows you to mix together a variety of remote control applications, including Citrix Independent Computing Architecture (ICA), Microsoft Remote Desktop Protocol (RDP), Virtual Network Computing (VNC), Secure Shell (SSH) and rlogin. All host names are displayed in a standard tree control that can be divided into folders, sorted alphabetically, and allow you to assign different logon accounts and secure passwords to each connection.
31. Multiple Monitors.32. Windows PowerShell Scripting. If you want to make the most of Windows PowerShell on Windows 7, you’ll need a quick way to build and debug scripts. Windows 7 comes with an interactive editor that allows you to try out cmdlets and test functions on the fly.
33. Drag-and-Drop Notification Icons. The redesigned notification area displays only a minimum number of icons; all other notification icons are moved to a side window. Rather than using the Customize option to select icons for the main display, you can drag-and-drop icons from the side window to the notification area.
34. Add Unindexed Shared Folders to Library. You can add UNC paths such as \\servername\sharename to a Library, but the server must index the folder. If you want to add a UNC path to an unindexed server, you can create a symbolic link to the UNC path, then add the link or links to the library. Use the mklink command. For example, mklink HomeFolder \\ServerName\Homefolder.
35. Simplify Cloned Machine Setups. You can’t run Sysinternals’ newsid utility to change the identity of a cloned Windows 7 machine (either a virtual machine or imaged PC). Instead, create a template installation then run sysprep /oobe /generalize /reboot /shutdown /unattend:scriptfile. Clone or copy this virtual machine file. When it launches, it will get a new SID and you can fill in the name. The reference for building unattended script files is at tinyurl.com/winunattend.
36. Snap That Aero. The Windows key is great for all your shortcuts. Now you can use it to work with the new AeroSnap feature in Windows 7. Select a window, hit the Windows key and a left or right arrow to snap the window to that half of the screen, or use the up arrow to snap it to the top of the screen.
37. Shortcut the Taskbar. The Windows key is great for shortcuts. You can select the Windows key and a number to correspond to items on your taskbar. So, if IE (for example) is the third icon on your taskbar (not counting the Start button), you can hit the Windows key and the number three to launch or open IE.
38. Manage Passwords. Control Panel includes a new application called Credential Manager. This may appear to be a completely new tool that allows you to save your credentials (usernames and passwords) for Web sites you log into and other resources you connect to (such as other systems). Those credentials are saved in the Windows Vault, which can be backed up and restored. However, you might see this as similar to a tool we have in XP and Vista. From the Instant Search, type in control /userpasswords2 and you will be brought to the Advanced User Accounts Control P
anel, where you can also manage passwords for your account (see 
Figure 4).

Figure 4 The Credential Manager provides a handy, secure place to store passwords. (Click the image for a larger view)
39. Trigger Actions. Event Viewer is closely tied into Task Scheduler. You have the ability to take an event (select it in Event Viewer) and then from the Actions pane, select the option “Attach a Task” to have that event, when it appears, trigger an action. That action can be: launch a program; send an e-mail; or display a message. This feature may be very helpful in troubleshooting a problem.
40. Browse InPrivate. A new feature in IE8 is the ability to open the browser in an InPrivate Browsing session that allows you to perform banking and so forth from a public location without fear of leaving behind any residue. IE will not retain anything you do in an In Private Browsing session. You can perform this action if you are already within IE by selecting the Safety button and then InPrivate Browsing. This will open another IE window altogether. However, you can save a few steps by using the shortcut. Right-click the desktop IE icon, click InPrivate and the windows will open in an InPrivate session already.
41. Go Live. Many applications installed on past versions of Windows have been removed. Starting with Windows 7, these applications (and a few others not typically installed with Windows) have been moved into the Live Essentials downloadable applications, at download.live.com. These applications include Messenger, Mail, Writer, Photo Gallery, Movie Maker, Family Safety and a few others.
42. Remove Apps. Although some applications have been moved off of Windows to become an optional download, other apps, such as IE8, Media Player, Media Center and DVD Maker are still included. In times past, especially when it came to IE, the applications were tied into the OS. However, in Windows 7 you can easily remove them if desired. Head to the Program and Features applet in Control Panel and select the “Turn Windows features on or off” link in the top left-hand corner. Then you can select the checkbox of the features you want to lose or add for your system (see Figure 5).

Figure 5 Windows 7 unbinds many applications from the OS, making it easy to add and remove them. (Click the image for a larger view)
43. Are You Windows 7 Experienced? > System properties has a rating called the Windows Experience Index (WEI). This rating is a collection of five different ratings that are determined by the Windows System Assessment Tool (WinSAT). The highest rating score is 7.9 (compared to 5.9 in Vista), using the categories of Processor, RAM, Graphics, Gaming Graphics and Primary Hard Disk. The final rating is not an average of all the ratings, but the lowest of the subcomponent scores.
44. Analyze Processes. One of the coolest new features in the revamped Resource Monitor (resmon) is the ability to see the “wait chain traversal.” An unresponsive process will be shown in red in the Resource Monitor; right-click the process and choose Analyze Process. This will show the threads in the process and see who holds the resources that are holding up the process itself. You can then kill that part of the process if you like.
45. Create Virtual Worlds. Virtualization capability has been added to the Disk Management tools. If you open Computer Management, go to the Disk Manager tool and then click the Action button at top, you will see the options Create VHD and/or Attach VHD. This allows you to create and mount a virtual hard drive directly from within the GUI. Note: With Windows 7 you even have the ability to boot a Windows 7 VHD (see Figure 6).

Figure 6 Windows 7 adds a great deal of virtualization support, including the ability to create and attach virtual hard drives from the GUI. (Click the image for a larger view)
46. Encrypt USB Sticks. Use BitLocker To Go. Maybe you’ve managed to never misplace or lose a USB key, but for the rest of us mere mortals, it’s a fact of life. Most of the time it’s no big deal, but what if it contains sensitive data? BitLocker To Go enables you to encrypt data on removable storage devices with a password or a digital certificate stored on a smart card.
The 14 Best Windows 7 Keyboard Shortcuts
The Windows key now performs a wide variety of functions. Here are a handful of the most useful ones:
64. Win+h – Move current window to full screen
65. Win+i – Restore current full screen window to normal size or minimize current window if not full screen
66. Win+Shift+arrow – Move current window to alternate screen
68. Win+E – Launch Explorer with Computer as the focus
69. Win+F – Launch a search window
70. Win+G – Cycle through gadgets
71. Win+L – Lock the desktop
72. Win+M – Minimize the current window
73. Win+R – Open the Run window
74. Win+T – Cycle through task bar opening Aero Peek for each running item
75. Win+U – Open the Ease of Use center
76. Win+Space – Aero Peek the desktop

47. Lock with Group Policy. Take control through AppLocker application control. AppLocker intercepts kernel calls that try to create new processes or load libraries and ensures the code is allowed to execute. Practically, that means you can eliminate unknown and unwanted software by implementing AppLocker through Group Policy.
48. Be Our Guest. Guest mode proves a convenient method to give a guest or child access to your computer with limits on making system changes, installing software, or writing to the disk outside the user profile. After the user is done and logs off, data saved inside of the user profile is deleted. 


49. Restore from Backed up Restore Points. You can choose to include restore points in your backups and restore from them when using System Restore. This is convenient if you want to create a baseline of a working configuration and be able to restore to it in the future without overwriting other data on the hard disk.
50. Benefit from BranchCache.BranchCache helps you save on round trips for requested files in remote branch scenarios. If one person requests a
file over the WAN, it’s cached locally and either distributed across computers at the remote branch or stored on a central server at the remote branch.
51. Disable Search Suggestion Popups. As you type in the Search Box, Windows 7 makes suggestions based on past queries by pulling past queries from the Registry. You can disable this in the Local Group Policy by enabling User Configuration | Administrative Templates | Windows Components | Windows Explorer | Turn Off Display Of Recent Search Entries In the Windows Explorer.
52. Pin Control Panel to Taskbar. If you use the Control Panel frequently, you may have noticed that you cannot simply right-click the Control Panel and select Pin to Taskbar. Instead, you must first Open Control Panel so its icon appears in the taskbar. From there, you can right-click the icon in the taskbar and select Pin this program to taskbar.
53. Leverage Search Connectors. You can now search the Web using the search functionality. Windows 7 includes Federated Search to increase the search scope beyond the local and network resources. Several search connectors are available, such as for YouTube and Twitter, or you can create custom ones to fit your needs.
54. Use Stickier Notes. Even though this feature has existed in previous versions of Windows in one form or another, it’s much easier to use in Windows 7. You can stick a note on your desktop for quick reminders. It’s a snap to change the font or note color. If you have a note selected, use Ctrl-N to create a new one.
55. Try out Improved WordPad. You probably haven’t given much thought to WordPad lately, but the version shipping with Windows 7 has undergone a major renovation. Think of it as a lite version of Microsoft Word. WordPad sports a spiffy ribbon interface, making it a snap to create well-formatted documents. Plus, you are no longer relegated to saving them as .RTF files. WordPad now supports the Office Open XML document (.DOCX) format. This makes it even easier to open .DOCX files created in Word in WordPad.
56. Calculate. Another basic utility that received a major overhaul is the venerable calculator. In addition to standard and scientific views, there are now programmer and statistic modes. You will also love the conversion and calculation features. Want to convert Celsius to Fahrenheit but can never remember the formula? Use the conversion panel. You’ll also enjoy the data calculation extension. Quickly find the difference between two dates or calculate a new date by adding or subtracting years, months or days.
57. Manage Services from Task Manager. The Windows 7 Task Manager now includes a tab to manage services. You can quickly see at a glance the status of all services on your machine. Click a column heading to sort. You can even start and stop services with a simple right-click. If you need full-blown service management, use the Services button to launch the Services management console. You may often have the Task Manager running in the system tray; now, having service management access means one less window to have open.
58. Get Under the Hood. Windows 7 offers more ways to peek under the hood without adding third-party solutions. A terrific example is the Resource Monitor. The performance tab in Windows Task Manager is a good start, but sometimes you need more information. Click the Resource Monitor button to get more detailed information and performance graphs for key subsystems like CPU and Disk. You can also find the Resource Monitor under Accessories | System Tools.
59. Check Vital Signs. Another new system tool you’ll enjoy is the System Health report. In the Run dialog box, type perfmon /report, which generates a system health report. This report records details about your computer’s performance, resource usage and more. The report also includes diagnostic information about things that aren’t working as they should and suggested steps to resolve. The reports are saved and can be accessed with the Performance Monitor management console. You can also save as an HTML file or send via e-mail.
60. Get More Windows PowerShell. Windows PowerShell v2 promises to be a game-changer for many system administrators. Many will prefer to use the graphical Windows PowerShell console, also known as the Integrated Scripting Environment (ISE). You’ll find this in the Windows Power Shell folder under Accessories. Add a keyboard shortcut of Ctrl+Alt+I to quickly launch it. Run any Windows PowerShell command in the lower panel and see the results in the middle. Create or edit scripts in the top pane. Open multiple Windows PowerShell sessions connected to remote computers. The ISE makes Windows PowerShell v2 easy to use and fun (see Figure 7).

Figure 7 Windows PowerShell has been much more tightly integrated with Windows 7, and adds the Integrated Scripting Environment. (Click the image for a larger view)
61. Put It on Old Stuff. One perhaps-not-so-obvious Windows 7 tip is that you should attempt to install it everywhere. One user has a 6-year-old laptop that originally shipped with Windows XP. He could never get Windows Vista to install on it. But Windows 7 installed without complaint and runs extremely smooth. Granted, there are some Windows 7 features he can’t take advantage of because the processor lacks certain features, but these are minor issues considering the laptop now has life again.
62. Improve Security. In Vista it was difficult to manage system protection via restore points. The System Protection tab in Windows 7 is a vast improvement. In one spot you can configure how much space to devote to restore points, delete and create restore points or even turn off system protection altogether. This is very useful on older systems where disk space may be at a premium.
63. Actually Use Help and Support. Much of Vista’s clutter has been reduced in Windows 7. For instance, the Help and Support page has three links, a search window and a link back to Microsoft’s Windows site. It’s much less intimidating for end users, so make sure they know about it. Search is much improved as well, making for a better, faster experience.

Template Powered By Blogger.| Distributed by Blogger Skiller