Transform Windows XP into Mac OS X

Transform Windows XP into Mac OS X

Posted by Anonymous  |  at  01:42


login-xp-mac-2
There are many ways to transform Windows XP into Mac OSX. For users who do not feel like to actually use MAC but love to have look and feel like MAC OSX for their Windows XP, this topic can help.
Following procedure is to turn XP into MAC OS X Leopard. It will not hurt your PC settings or software. Windows settings will remain same and software will work fine. This is just a transformation which changes the look and feel of you Window XP.
Easy to use transformation pack for turning your Window XP to Mac OSX is Flyakite OSX. Flyakite is freeware and is not affiliated or endorsed by Apple or its affiliates.
flyakite-1
FlyakiteOSX is a transformation pack. It will transform the look of an ordinary Windows XP+ system to resemble the look of Mac OS X. The installer simply automates the process of replacing critical system files, setting registry tweaks, and installing extras such as cursors, sounds, visual styles, etc. FlyakiteOSX DOES NOT contain any spyware or ad-ware of any kind. All files needed for FlyakiteOSX are stored in the Windows directory in a folder named ‘FlyakiteOSX’ that is hidden by default. All registry values for FlyakiteOSX are written to HKEY_LOCAL_MACHINESoftwareFlyakiteOSX.
Transformation Using Flyakite OSX
  • Download Flyakite OSX
  • Double click the downloaded file to install the transformation pack
  • During the installation, create a restore point (for safely switching back, if anything goes wrong)
  • Install the package
  • Restart your computer
  • Done

XP Login ScreenShot

login-xp-mac-2

XP Desktop ScreenShot

desktop-3

Transformation Using Brico Pack – LeopardXP

bricopack 
Using Brico pack-LeopardXP you can transform Windows XP into MAC. This is all in one transformation pack having everything you need for transformation. The visual transformation is full. The menu bar moves to the upper side of the screen, the start menu is substituted by the apple, window controls move to the left and are the same you use in a Mac. Yes, you’ll also have the famous Dock, a toolbar that gives you direct access to several applications and that gives a really good movement sense, in fact it is placed there by using one of the most famous pieces of software for Windows customization. Finally, the background will be changed and if anybody visits you, he will be amazed to see that you are using MAC. It happened with me. My colleague was using Ubuntu Transformation pack for XP. When I saw 3D style desktop and scrolling windows and charming visual style, I was amazed and asked him that he is using Linux. He smiled and said, Oh Yeah! Later on I realized the fact.
preview_leopard 

leopardxp-shot

Download Brico Transformation Pack – LeopardXP (40+MB)

If you do not need heavy transformation pack with 40+MB size. You can style your Windows XP with LeopardXP VS Theme.

XP Transformation Using LeopardXP VS Theme – (2.25 MB)

leopardxp_vs_1_1_by_vladimir0523
This ‘Apple OS theme’ for XP is of 2.25 MB size and it will transform your XP look, like Leopard MAC OSX. The skin is comparatively light weighed than LeopardXP Brico Pack.

Download LeopardXP VS Theme


Do It Yourself XP to MAC Transformation

Another way is to customize Windows objects and portions one by one yourself. There are many little tools available, ready to turn XP into MAC like appearance.
Following tools will help your XP transform into MAC OSX. Choose your best tools.
  • StyleXP or WindowBlinds (skins the Graphical User Interface of your operating system)
  • ObjectBar (the white Finder bar on the top of Macs; has File, Edit, View, etc. on it.)
  • ObjectDock, YzDock, or MobyDock (The dock on the bottom of a Mac that contains icons and shortcuts to programs)
  • Trillian (chat program that can be skinned to resemble iChat)
  • YzToolbar (skins the toolbar icons in your Windows windows)
  • YzShadow (puts a lovely drop shadow under your windows like in Mac OS X)
  • Rainlendar (popular skinable desktop calendar)
  • Rainmeter (skinnable desktop system statistics)
  • Samurize (can display just about anything, such as clocks, uptime, and the weather)
  • iTunes for Windows
  • Icons (Over a 1,000 icons lifted from Mac OS X 10.3 aka Panther)
Engadget has a bit detailed version about transforming XP into MAC by using these tools.

Famous MAC Wallpapers for your Desktop Background

If you just transformed Windows XP into MAC by using custom tools, then look at these amazing wallpapers just for MAC. First one is the right choice for your desktop background and you are ready to use your Windows XP powered by MAC, but only you will know it, not your friends.
starfield 
 
grass

Xilisoft HD Video Converter v7.7.0 + Key

Xilisoft HD Video Converter v7.7.0 + Key

Posted by Anonymous  |  at  00:51

Equipped with advanced High-Definition (HD) video conversion technology, Xilisoft HD Video Converter can easily convert HD video formats such as AVCHD (mts, m2ts), H.264/AVC, MKV, MPEG-2 (ts), DivX, HD WMV, MPEG-4 and Quick Time. Sit back and let Xilisoft HD Converter do the job for you, convert from HD videos to Standard-Definition (SD), or even upgrade an SD video to HD!
Besides converting among HD video formats, the Video Converter can also extract and convert audio files, capture pictures from various videos and even set the output file size.
  • Support HD videos such as AVCHD (mts, m2ts), TS, H.264/AVC, MKV
  • Convert popular formats like AVI, MPEG, WMV, MP4, DivX, RM, MOV, and FLV
  • Convert HD to SD videos and audios; supports CD decoding
  • Transfer output files to iPad/iPad2/iPhone 4/iPod/PSP/iTunes directly after conversion
  • Support NVIDIA CUDA & ATI Stream technology
Features:
  • High HD video converting speed and rich formats
  • Flexible settings to simplify your HD video conversion
  • Run the HD converter in background
System Requirements:
  • OS: Microsoft® Windows XP (SP2 or later), Windows Vista, Windows 7
  • Processor: 1GHz Intel/AMD processor or above
  • RAM: 256MB RAM (512MB or above recommended)
  • Free Hard Disk: 100MB space for installation
  • Graphics Card: Super VGA (800×600) resolution, 16-bit graphics card or higher

Transform Windows XP into Linux Ubuntu

Transform Windows XP into Linux Ubuntu

Posted by Anonymous  |  at  12:29

ubuntu-desktop-1
Transform Windows XP into Ubuntu. There is no single installer for this one. But yet these tools in combination can give Windows XP, look of Ubuntu. The good thing about having a package with all these elements, categorized in several different folders, is that you can choose what to install and what to leave unchanged. The downside is that you have to do it step by step. But thats what we call geeky, eh! You can install and uninstall these as you wish to. These will not disturb your Windows XP files, programs and settings but just transform the look and feel of your Windows XP into beautiful Linux Ubuntu version.
ubuntu-docs-2, XP into Ubuntu
ubuntu-3d-desktop-3, XP into Ubuntu

Transform Windows XP into Linux with UbuntuXP

UbuntuXP is the Ubuntu’s look for your Windows XP. The package comes with some installers to change different visual aspects of Windows XP into Linux Ubuntu.
xp-to-ubuntu, XP into Ubuntu

How to Install – XP into Ubuntu

  • Unpack the rar file
  • Install “uxtheme patcher” from folder called “APPS”
  • Restart your system
  • Look for “Visual Styles folder” and use “Clearlooks” to change theme of Windows XP
  • Look for “Icons Folder” and use “Super_Turbo_Tango_Patcher_August_2006″
  • In “Apps” folder you can find a folder called FindeXer Nightly V1.1.0.3.
  • Cut this folder and put it in C:
  • if you wish or any place you want, after that in the folder findexer you can find a “readme” file, read it please its very important.
  • Use the icons on “Ubuntu PNG” folder to change the icons, see the screenshot in the folder.
  • If you want to change the picture of the Classic Start menu on Windows XP, you must use “reshack and replacer”.

Download Windows XP to Ubuntu Transformation Pack

Transform Windows XP into Linux with Ultimate Transformation

There is another package which comes with some of installers including clearlooks, human(Ubuntu), Plastic(KDE), Icons pakage, Tango_Patcher and cursor package for Windows XP to turn it into Ubuntu.,

Download Windows XP to Ubuntu Ultimate Transformation Pack

Customize Windows XP to Ubuntu Visual Style Yourself

Here are some more links to give your Windows XP a visual style of Ubuntu. Skins, patches and more…
By installing them you can make your Windows XP look like Ubuntu Linux. Just like Ubuntu itself, all programs are freeware.
Note: Before proceeding to these files make sure you click there at the download button. Do not be confused there by staring at the images. You will see each application’s screen shot there. At the left side of screen there is download link to download not that image, but the required installer which will tweak your XP.
What you will get from these link? Have a sneak peak preview.
human_for_windows_by_fioressj

Download Linux Ubuntu High Resolution Wallpapers for Desktop Background

Click the image for full resolution wallpaper download.
ubuntu-wallpaper-1 

ubuntu-wallpaper-2 

ubuntu-wallpaper-3 

intelmac-blue 

intelmac-graphite 

intelmac-green 

intelmac-orange 

intelmac-purple

HTC wildfire 2.2.1 root to HTC wildfire Android 2.3

HTC wildfire 2.2.1 root to HTC wildfire Android 2.3

Posted by Anonymous  |  at  01:29

Sometime ago I got an HTC Wildfire and was having loads of fun using it, but every time I wanted to do anything more  "creative" i was stopped by the binded nature of phone, hence i decided to root it (jailbreak it apple fellas) and get complete control over my device. Here, I am covering step by step guide to root HTC wildfire 2.2.1 and install Android 2.3 on HTC Wildfire.
To do the rooting you must have your Wildfire with S-OFF, HBOOT 1.02.0002 and Android 2.2.1 . You can check it by booting into HBOOT (power on your phone by holding the VOLUME DOWN + POWER button) .This method is strictly for the 2.2.1 owners. How you can turn the S-OFF is your headache, you can try the alpharev (ask the team if they can get you a 2.0 test version... :P) or you can wait for Unrevoked 3.33 or you can straight off go to market and hunt for XTC clip. Either way, try it and don't attempt to anything before you get S-OFF. Actually the notorious S-ON flag is the cause rooting wildfire is such a pain in the a**.
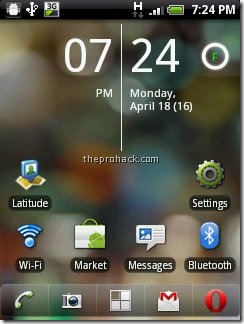
I used to have this
Android 2.2.1
and I converted it into this :)
3
or this =)
7
Anyways, here is how you can root HTC wildfire 2.2.1 and get htc wildfire Android 2.3
What you need ?
  • HTC wildfire with S-OFF , HBOOT 1.01.0002 , OS Froyo 2.2.1
  • USB Drivers (Download)
  • RUU Rom 2.1 / RUU_Buzz_HTC_WWE_1.14.405.2_R_Radio_13.45.55.24_3.35.15.31_release_130814_signed (Download)
  • Unrevoked 3.2 Test version (Download)
  • Cyanogenmod 7 (Download)
  • Time and Patience & last but not the least,
  • Balls of Steel
    Disclaimer
    I am not responsible if your phone gets bricked, by following the process you are voiding your warranty and significant damage may be caused to your device.
    Its all for educational purposes only, if you are dumb enough to screw somewhere then I will be the one who will be laughing at you.
    Software are unpredictable in nature, one may/may not act as predicted especially in case of rooting (personal experience). Hence my friend, tread carefully.
    in short,
I AM NOT RESPONSIBLE FOR YOUR STUPIDITY.
Step 1 - Installing the USB drivers
Download USB drivers and extract them on desktop. Turn off your wildfire and boot into HBOOT by holding the VOLUME DOWN + POWER button. Connect your phone to your PC and it will show "drivers installing" or similar there for Android device. When prompted , install the drivers by going to device manager and browsing to the folder where you extracted the drivers. Once installed, disconnect and reboot your phone normally.
Now you need to install the Android bootloader interface. Connect it to your HTC wildfire to the PC and it will ask for drivers again, now go to device manager, click on unknown device,

click on update driver -> install from specific location -> No i will choose to install -> choose Android phone and click on adb interface -> click next -> when asked to install click on continue anyway, just install them.
Once done you will see your phone recognized as "Android bootloader interface". Now disconnect your phone and go into

settings -> applications - > development - > enable USB Debugging.
Congratulations, the first step is complete.
Step 2 - Downgrading from Android 2.2.1 Froyo to Android 2.1 Eclair
Download the RUU rom which is an original stock rom. Plug your phone into the PC and set it to "Charge through USB". Double click RUU rom .exe. Follow the on screen instructions and then let it install. Your phone will reboot into stock HTC 2.1 :) This will be the last time you will be seeing it though.
rom
The HBOOT version will be now 0.80.0002 (check it by powering on your phone by holding the VOLUME DOWN + POWER button)  Once done disconnect your phone.
Step 3 - Gaining root using UnrEVOked , get clockworkmod and set your phone free :)
Download the test version of unrevoked. Let me repeat, DO NOT USE UNREVOKED 3.32 as it will lead to CID errors or to be precise this error

"validation error backup cid is missing"
This may be caused as the 3.32 doesnot support HBOOT 0.82.0002. Hence You need specific test version of Unrevoked 3.2 to do the job. Download it, save it on desktop, and run it. Now connect your phone and the rooting will start. Once donw, you will have Clockworkmod recovery installed on your phone. Reboot your phone now (using the VOLUME UP/DOWN key for navigation and clicking using TRACKBALL, the POWER button takes you back in menus). Once rebooted, you will see the superuserapp in your phone and congratulations, your phone is successfully rooted :)
Step 4 - Installing Cyanogenmod 7 or Android Gingerbread 2.3.3
Download the Cyanogenmod 7 with google apps and save it on desktop, connect your phone as USB diskdrive and transfer both zip files on SD card. Once done, reboot your phone into ClockworkMod Recovery (booting by holding the VOLUME DOWN + POWER button and clicking on recovery)
Once the device boots into the ClockworkMod Recovery, use the side VOLUME buttons to move around, and either the POWER button or the TRACKBALL to select.
  • Select the option to Wipe data/factory reset.
  • Then select the option to Wipe cache partition.
  • Select Install zip from sdcard.
  • Select Choose zip from sdcard.
  • choose update-cm-7.0.0-buzz-signed.zip & Let it install.
  • Once done, Select Install zip from sdcard.
  • Select Choose zip from sdcard, choose gapps-gb-20110307-signed.zip
  • Once the installation has finished, to get back to the main menu by clicking the POWER button and select the Reboot system now option.
Congrats..The HTC Wildfire should now boot into CyanogenMod.
Finally rooted :)
Android terminal emulator running on superuser privileges
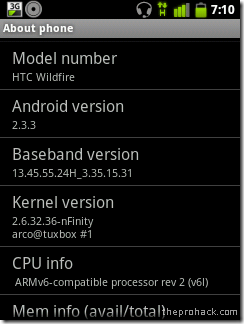
Enjoy Android 2.3.3 :)

Internet Download Manager 7.15 Precracked With High Speed

Internet Download Manager 7.15 Precracked With High Speed

Posted by Anonymous  |  at  15:15

Internet Download Manager With High Speed
Internet Download Manager (IDM) is a tool to increase download speeds by up to 5 times, resume and schedule downloads. Comprehensive error recovery and resume capability will restart broken or interrupted downloads due to lost connections, network problems, computer shutdowns, or unexpected power outages. Simple graphic user interface makes IDM user friendly and easy to use.Internet Download Manager has a smart download logic accelerator that features intelligent dynamic file segmentation and safe multipart downloading technology to accelerate your downloads. Unlike other download managers and accelerators Internet Download Manager segments downloaded files dynamically during download process and reuses available connections without additional connect and login stages to achieve best acceleration performance.
Internet Download Manager supports proxy servers, ftp and http protocols, firewalls, redirects, cookies, authorization, MP3 audio and MPEG video content processing. IDM integrates seamlessly into Microsoft Internet Explorer, Netscape, MSN Explorer, AOL, Opera, Mozilla, Mozilla Firefox, Mozilla Firebird, Avant Browser, MyIE2, and all other popular browsers to automatically handle your downloads. You can also drag and drop files, or use Internet Download Manager from command line. Internet Download Manager can dial your modem at the set time, download the files you want, then hang up or even shut down your computer when it’s done.
Other features include multilingual support, zip preview, download categories, scheduler pro, sounds on different events, HTTPS support, queue processor, html help and tutorial, enhanced virus protection on download completion, progressive downloading with quotas (useful for connections that use some kind of fair access policy or FAP like Direcway, Direct PC, Hughes, etc.), built-in download accelerator, and many others.
  • How To:
  • Unzip.
  • Run the program.
  • Click Install IDM TAB.(To patch hosts file must run as Administrator in Win Vista/7)
  • If already installed and having a FAKE SERIAL then use the FIX FAKE SERIAL TAB.
  • If FRESH installed then go to IDM LIFETIME PATCH TAB.(In Patch box Write any Name or any email and it automatically registered to FULL VERSION)(You can also Update IDM..)
  • To maximize speed from 8 becomes 16, use the IDM SIMPLE OPTIMIZER TAB.(MAKE SURE TO EXIT IDM BEFORE PATCHING THE OPTIMIZER)
                                                                      
1 
2 
3 
4 
5 
6

Driver Easy Professional 4.3.2 Portable

Driver Easy Professional 4.3.2 Portable

Posted by Anonymous  |  at  16:25

DriverEasy Pro 4.3.2 FREE Download Full Version - Is one of reliable software for use inspect, search, and download and install the latest drivers and the driver has not been installed on our PC. DriverEasy Pro automatically detects hardware drivers have not been installed or the latest version update is available and provide a download link all the relevant drivers for our next download and install. 
Driver Easy is such a practical tool that helps you solve the driver problem easily. It can auto-detect and download the latest suitable hardware drivers for your computer by just several clicks. With the friendly user interface, Driver Easy is quite easy to use that you can completely download all latest device drivers within 3 clicks.
Features
Your One-Stop Driver Solution
Driver Easy is design for Quickly and easy to identify unknown device's drivers, and keep your driver in latest version. Much more, we have implement driver backup, driver restore, and driver uninstall feature, to Ensure your driver secure and safe.
Smart "Auto-Installation"
This smart feature is our Industry first technology! It enable user to install the driver automatically, even help you extract, analyze & install it. What you need to do is to click your mouse once or twice.
Detect Unknown Device Driver
Driver Easy has a huge online database, roomates include over 100,000,000 hardware device's driver, with it revolutionary driver detect engine, it help you download the unknown device driver, help you fix the driver issue.
Keep Existing Driver Up-to-Date
With our daily update driver database, your system will improve the performance, fix the blue screen problem, add more enhance feature by install the latest drivers.
Backup & Restore Drivers
Do not worry about it if you lost the driver disc, Driver Easy can backup the driver your current installed, you can restore it after system reload. This is an benefit feature if you not sure are the new driver compatible your system or not, you can backup existing driver, and roll-back it later.
Uninstall Removed Hardware Driver
When you replace the graphic card, do you know Windows still keep your old one driver, and will launch it each time, when Windows start up. This will case the system slowing boot up, and may case some system conflict. Driver Easy allow.

How To Activate Windows 8 Permanently 2013/01/1

How To Activate Windows 8 Permanently 2013/01/1

Posted by Anonymous  |  at  15:37

How To Activate Windows 8 Permanently 2013/01/1

How To Activate Windows Permanently
  • Open the folder "Permanent Activator"
  • Right Click on "Windows 8 Permanent Activator [x264+64]" and select "Run as Adminstrator" and let it extract
  • Now click on WINDOWS 8 INSTALL/UNINSTALL which will start the activation process in Windows CMD
  • CMD will ask to confirm the activation, then type Y and hit ENTER to start Activating.
  • Activation process may take couple of minutes.And also your PC will restart once activation is finished.
  • After activation is done and your PC restarts you will get a prompt saying Windows is activated and other details.
Note : Windows 8 has special improvents as well as security.
Therefore, until it is not activated, you wont be able to do any personalization to your pc.
This activator must activate your windows Permanently and enable Personalization settings. If it fails to Enable Personalization Settings, Please follow the below instructions [Please remember not to do the below settings if your personalization settings are enabled.]

 
How to Enable Personalization Setting (First Activate Windows from above procedure)
These instructions are "ONLY AND ONLY" for those who are not able to access the personalization settings after Activating Windows Permanently.
  • Open the folder "Permanent Activator"
  • Right Click on "Personalisation FIX" and select "Run as Administrator" and let it extract
  • Windows CMD will automatically Run fix and restart your PC
After restart, you should be able to Access Personalization settings

Microsoft Office 2013 Professional Plus VL Full Version + Activator Free Download

Microsoft Office 2013 Professional Plus VL Full Version + Activator Free Download

Posted by Anonymous  |  at  15:32


Guru Software World: After Microsoft launched Windows 8, Microsoft also released the latest MS Office. This time I will share Office 2013, the latest version of Microsoft Office. Who does not know this software? software that must be installed on your computer to facilitate the work. Office 2013 has a more elegant look, and new features of course. Curious as to what MS Office 2013, please download it.

System Requirements:
  • 1 Ghz or faster x86-or x64-bit processor with SSE2 instruction set
  • 1 GB RAM (32-bit), 2 GB RAM (64-bit)
  • 3.0 GB Hard Drive Available
  • Microsoft Internet Explorer 8, 9, or 10; Mozilla Firefox 10.x or a later version; Apple Safari 5; or Google Chrome 17.x
  • Operating System Windows 7, Windows 8, Windows Server 2008 R2, or Windows Server 2012
  • Graphics hardware acceleration requires a DirectX 10 graphics card and 1024 x 576 resolution
  • NET Framework 3.5, 4.0, or 4.5
Activation Tutorial:
Note:
Office Installer form ISO, install it by extracting ISO file, and run "setup.exe", or can also use Virtual Drive
To switch the mouse cursor (Emulator >>> Main System), Press "Ctrl + Alt" (There is a description in the Title bar)
Activator This only works for Office 2013 with Volume license (VL), does not work for Retail.
Office will be activated for 180 days, if it has expired, please just do the re-activation with the same steps
Turn off all security, such as Antivirus and Firewall
Please connect to the Internet because you will need to adjust the time
Expected MS Office 2013 was installed correctly and NOT activated by other activators
Following the steps of activation office 2013:
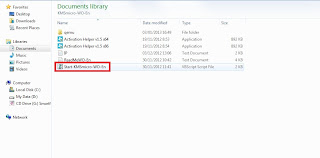
  • Open the "Start-KMSmicro-WO" and wait until the menu (Blue display)
  • Do not press any button while loading!
Microsoft Office 2013 Professional Plus VL Full Version + Activator

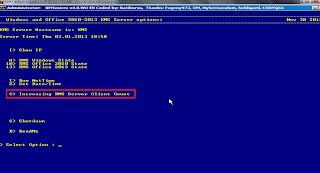
  • When finished, select "Increasing KMS Server Client Count" by pressing "C" button, and wait a few moments
Microsoft Office 2013 Professional Plus VL Full Version + Activator
  • When he appeared the command "Press Any Key To Continue", press any key to continue
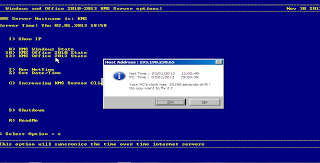
  • Then press "T" to adjust the time via the internet, and then press ENTER
  • When the options appear, click YES
Microsoft Office 2013 Professional Plus VL Full Version + Activator
  • When he appeared the command "Press Any Key To Continue" again press any button to continue
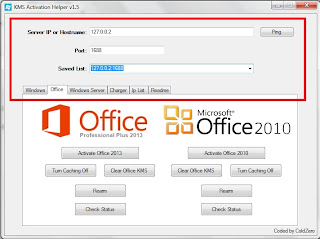
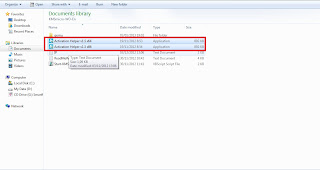
  • Open the "Helper v1.5 Activation" and customize to your office, x86 (32-bit) and x64 (64 bit), In accordance with the one you downloaded
Microsoft Office 2013 Professional Plus VL Full Version + Activator
  • Click the tab "Office", then select the menu "Saved List" select "127.0.0.2: 1688", After that, click "Activate Office 2013"
Microsoft Office 2013 Professional Plus VL Full Version + Activator

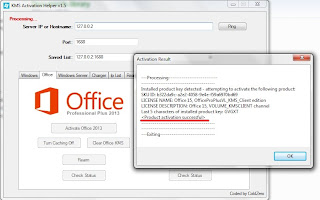
  • Wait until the warning "Successful Product Activation" appears, if fails, replace it with another IP
Microsoft Office 2013 Professional Plus VL Full Version + Activator
Download 32-bit: 
Download : Microsoft Office 2013 Professional Plus VL Full Version + Activator 
Size: Part 1-3 = 200 MB, Part 4 = 6 MB
DOWNLOAD HERE
Password: gurusoftwareworld (if required)
KMSmicro Activator 3.2

Template Powered By Blogger.| Distributed by Blogger Skiller