Disable Autoplay of Audio CDs , Blank CD or DVD media and USB Drives in XP and Vista
Posted by Anonymous | at 14:38
No comments
Feel bad when autoplay notification tease again and again here is simple trick to disable it (For XP)
Steps :
- To get to the configuration screen for this setting, go to Start Menu \ Run and type in:
gpedit.msc
- You will see the Group Policy window. You should select Administrative Templates \ System in the tree view:
- You will see an item in the right side pane called “Turn off Autoplay”
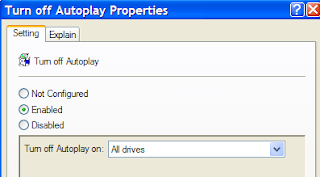
- Double click the item, and set the radio button to Enabled, and change the “Turn off Autoplay on” to All Drives.
- Now you should be safe from the autoplay monster.
Disable AutoPlay in Windows Vista
Windows Vista’s AutoPlay options are a great improvement over Windows XP in terms of flexibility, but unfortunately there are so many options that it can be confusing, especially since there’s no specific mention of USB Flash drives in the options.
Windows Vista’s AutoPlay options are a great improvement over Windows XP in terms of flexibility, but unfortunately there are so many options that it can be confusing, especially since there’s no specific mention of USB Flash drives in the options.
- Open your Control Panel, and then click on “Play CDs or other media automatically” to open the AutoPlay dialog.
Disable AutoPlay Globally
- The quickest way to disable AutoPlay entirely is to just uncheck the box for “Use AutoPlay for all media and devices”, which should usually work.
Disable for a Single Type
- You can choose a setting in the drop-down menu for a single type of drive, for instance Audio CD in this example. For this to work you’ll have to make sure to keep the global autoplay option on, and then choose the specific setting in the drop-down.
Disable for just Removable (flash) Drives
- The problem here is that while there are settings for Audio CDs and DVDs, there’s nothing specifically for USB flash drives. Windows will determine the drive type based on the content it finds on the flash drive itself, so that’s what we’ll need to change.
- In order to disable AutoPlay for the removable drives, you should change all of the following to Take no action: Software and games, Pictures, Video files, Audio files, and Mixed content.
Disable Through Group Policy
- A number of readers have written in complaining that the option to disable autoplay isn’t working for them, so if you’d like to disable it entirely you can use the Group Policy editor on the Business and Ultimate versions of Vista.
- Open up gpedit.msc through the start menu search box, browse to Windows Components \ AutoPlay Policies, and change the value of “Turn off Autoplay” to enabled.
- You can choose whether to disable for just removable devices, or entirely. I’m not sure if that makes any sense, however.
Disable with Registry Hack
The Group Policy editor is not available on Windows Vista Home editions, so I’ve also included the registry tweak to disable AutoPlay entirely.
Download and unzip this registry hack and then double-click on the appropriate file.
The Group Policy editor is not available on Windows Vista Home editions, so I’ve also included the registry tweak to disable AutoPlay entirely.
Download and unzip this registry hack and then double-click on the appropriate file.
- DisableAutoPlay.reg will disable autoplay entirely.
- DisableAutoPlayRemovable.reg will disable autoplay on removable devices.
Disable AutoPlay of Blank CD or DVD media
- Ubuntu will automatically launch a CD burning tool when you insert a blank data cd or dvd. This can sometimes interfere with something else you are doing right at that moment.
- To disable this, navigate to System \ Preferences \ Removable Drives and Media:
- Uncheck the box, and you will no longer autoplay blank discs.
About the Author
Khawaja Ali is the author of this blog he is 18 year old white hat hacker, web-designer and a young programmer currently living in Khushab and studing in Punjab College Jauharabad.He love to help others thats why running this blog.Thanks for visiting here.
Get Updates
Subscribe to our e-mail newsletter to receive updates.
Share This Post
Related posts


0 comments: